Right or Left?
The first thing you must determine is whether you shoot right-handed, or left-handed. Sounds simple enough, right? You know whether you write left-handed or right-handed. You know which way you swing a golf club or a baseball bat. But does that have anything to do with deciding whether you shoot a puck right-handed or left-handed? It depends on which faction you believe. The Canadian contingent argues that your dominant hand should be at the top of the stick. So in Canada, if you swing a baseball bat right-handed, you are a left-handed hockey player. The U.S. faction argues just the opposite. If you swing the bat right-handed, you're a right-handed shot.Which one is correct? That depends. For a young kid just starting out, the Canadian theory would be preferred. Stick handling does require more use of the top hand, with the bottom hand just along for the ride. But for anyone over the age of 18 you should shoot the same way you bat or swing a golf club. The U.S. argument relies on the theory that your dominate hand delivers more force when shooting, and the bottom hand controls the majority of the wrist-twisting required to elevate the puck when shooting or making saucer passes.
I would recommend that you go to the hockey store and try both. Buy what ever is comfortable for you, eh?.
Lie
The lie of a hockey stick is the angle formed where the stick shaft meets the stick blade. Manufacturers produce sticks with a lie of 3.5, to a lie of 8. So you can buy a stick with a lie of 3.5 (Warrior ONLY), 4 (Warrior ONLY), and 5, or 6 (every manufacturer). Sticks with a lie of 7 or 8 are rare.
The lie numbers correspond to angles. The numbers are used instead of angles in degrees because most people hate math, and anything with the degree sign "°" must be math. Here is how the lie numbers relate to angles in degrees.
lie 3.5 is 138°
lie 4 is 137°
lie 5 is 135°
lie 6 is 133°
lie 7 is 131°
lie 8 is 129°
As you can see, each number is different by 2°.
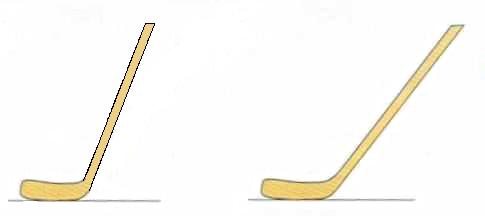
The stick on the left has a higher lie number than the stick on the right.
So what does this mean to you? Well lie is the most over-looked feature of hockey sticks. Yet it is vital to get it right in order to be able to stick handle, pass, and shoot the puck. Here's why. If your lie is too large (larger number=smaller angle) the toe of the stick blade will be off the ice when you are in your hockey stance. If your lie is too large the heel will be off the ice. Ideally you want the entire blade to be on the ice when in your hockey position: knees deeply bent, knees over the toes of your skates, slightly bent forward at the waist, chest and head up. In order to achieve that you must have the correct lie for you.
Generally speaking, taller people use high lie numbered sticks (6), and shorter people use lower lie numbered sticks (4). Those "average" people use a lie 5.
One way to check this is to check the wear on the tape you wrapped around your blade. If the wear is mostly on the heel, your lie is too large. If the wear is mostly near the toe of the blade, your lie is too small. A too small lie rarely happens, since most people buy sticks with a larger lie number because that's what most stores stock. Unfortunately you have already purchased, cut, and used the stick so you can't return it and get the correct lie, you must buy a new stick.
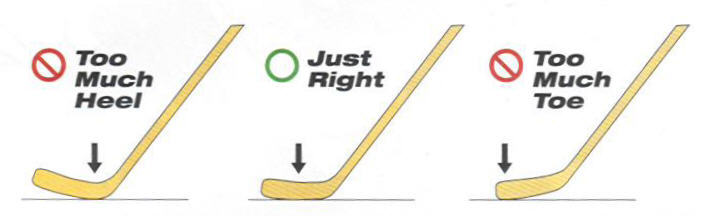
This image illustrates the effect incorrect lie will have.
Note that the puck will find the part of your stick that is off the ice.
Stick length can affect lie. Most players cut their stick so that when standing in skates the butt end of the stick is level with their nose (with the toe of blade on ice). This makes the stick too long, meaning that the toe will be off the ice, just as if they had a too-large lie numbered stick. The proper length is at or slightly below the chin, when standing in skates. More on length below. Here is a photo of photo of all of my sticks. You counted correctly, there are thirteen of them. The five on the left side of the photo are the ones I take to the rink. The two orange sticks at left are custom-made Warrior sticks. The wooden stick at extreme right has a piece of PVC pipe on the shaft which I use to practice rotating the stick with my upper hand only. My right hand grips the PVC pipe. The four sticks to the left of the wooden one are cut so I can use them without skates. The three in the middle I don't use because they are lie 5 sticks, which I bought before I understood the concept of lie. All the others are lie 4. So if you don't want to waste money on the wrong sticks, read on.
;)
Senior or Intermediate?
Sticks come in youth, junior, intermediate, and senior flavors. We'll stick to intermediate and senior sticks.Before I knew about intermediate sticks I bought senior sticks which in addition to having the wrong lie, also had too little flex. All my newer sticks are intermediates.
An intermediate stick usually has a junior-shaft with a senior blade (hence the term intermediate). The shaft is somewhat narrower and easier for smaller hands to grip. It has the same blade as an equivalent senior stick. Intermediate sticks are shorter and have lower available flex numbers than senior sticks. They also cost somewhat less.
You can get sticks custom made without ordering a large quantity. In fact most manufacturers will let you get a single stick custom made. I have used Warrior's custom made sticks and I prefer them. Originally I bought one because Warrior is the only company that offers sticks in lie 4. Having them custom made allows me to get the lie, blade curve, finish, and colors that I want and it costs no more to get them custom made than it does to buy them off the rack in a hockey store.
Stick Flex
The flex of a hockey stick is a number that is associated with the force needed to bend, or flex, the stick shaft. The lower the flex number, the less force required to bend the stick, but also the less energy stored in the stick which is released at the end of your shot, adding extra kick to the puck.Sticks are offered with flex values ranging from 55 to 110 (intermediate and senior) and much less for junior and youth sticks. The flex values correspond directly to the number of foot-pounds of force required to bend the stick 1-inch. So to bend a 100-flex stick 1-inch requires you to apply 100 foot-pounds of force (440 Newton-meters). The bigger and stronger you are the higher the flex number you can use.
So what's the big deal about flex? Well, if it takes you 100 foot-pounds to bend the stick while shooting, that 100 foot-pounds is stored in the stick shaft as potential energy. When you release the puck the stick snaps back to its original shape and imparts that 100 foot-pounds of force to the puck, in addition to the force you apply in the act of shooting. But don't rush out and buy a stick with a flex value of 110 unless you can actually bend it 1-inch.
Be aware that cutting the stick increases the effective flex value. If you start off with a 85-flex stick and cut two inches off of it, the effective flex is now 95. If you cut four inches off the effective flex soars to 103. That means that it will take more force from you to bend the stick.
Sticks with a high flex value are less prone to being broken, either in the act of shooting, or when some goon slashes your stick.
Blade Curve
Blade curve is the amount of difference between the position of the heel of the stick and the toe. NHL rules (and most sactioning bodies use NHL rules to a degree) require that the total amount of curve be no more than 1-inch, measured at the ceter of the blade.

This image illustrates blade curve. The red line indicates where the stick is measured and that distance can be no more than one inch
Alex Ovechkin's sticks are right at the limit. Most players however, use sticks with much less curve. Here's why. The more curve in the blade, the harder it is to control the puck, make or receive passes, and accurately shoot the puck off the backhand.
There are four types of curves: Heel curve; Mid-heel curve; Mid-curve; Toe Curve. Which one you use depends on your level of experience and personal prefernce.
When starting out, pick a blade that is as flat as possible with a mid-curve. This allows you to learn to make and receive passes easily, and it also gives you the best backhand shot. Finding a blade that has no curve is practically impossible. I found that the stick with the friendliest curve for beginners is the Savard curve. After I learned to stick handle and pass, I moved to the Vanek curve, which has most of the curve at the toe and the blade face is slightly "open" towards the toe, making it easier to lift the puck when shooting, and when making saucer passes. Just for laughs I bought a stick with the Here is a photo of my Alex Ovechkin curve. It is wild. It is almost impossible to keep to keep the puck on the ice when using that stick. Every shot goes high, with no particular effort on my part. Every pass is a saucer pass with that stick. So I rarely use it.
;)
;)
;)
Blade Face
There are two types of blade face. Open, and closed.A closed-face blade is preferable for beginners. It is much better for receiving and making backhand passes, and it is also better for backhand shots. This is the most common blade face you will find in stores. The Savard blade has a closed face and is the blade I chose when starting out (see the photo above).
An open-face blade has the blade curving back starting at about the mid-toe region of the blade. This face is good for elevating, or "lifting" the puck when shooting, or when making saucer passes. After I got some experience I chose the Vanek blade (see the photo above) which has an open toe and a mid-curve. It is good for cradling the puck, and lifting it, but it is still a good blade for backhand passes and shots.
Stick Length
The conventional wisdom is to put your skates on, and place the stick vertically with the toe on the ice, and cut the stick at the top where it meets your nose. The conventional wisdom is wrong. Cutting the stick to that length leaves you with a stick that is too long, making stick handling correctly nearly impossible. Why? Because cut to that length, the stick will probably be too long, resulting in the toe being off the ice.Instead, cut the stick at the point where it is level with your chin, a fraction of a millimeter below that point. This will enable you to skate upright and have the entire blade on the ice at all times, making you better able to receive passes without them sliding under the upward pointing toe you would have if you cut the stick longer.
That is a guide. If your arms and legs are shorter/longer you may have to experiment before you cut.
Tape or Tacki-Macs?
Players typically put "stick tape" on the blades and the butt-end of their sticks. The tape on the blade does two things. One it protects the bottom of the blade from frictional wear from the ice surface, and two, it protects the face of the blade from puck impacts. Some players also claim that it makes the puck stay on your stick more than it would without tape. That's why players tape.Players tape the top or butt-end of their sticks to give more friction so their hands grip the stick easier. Some players put additional tape at the butt end so the stick does not slide out of their hand. That's all well and good, but stick tape wrecks the palms of hockey gloves. A better solution is the Tacki-Mac command stick grips.
I use what was formerly referred to as the "Patrick Kane" grip. The licensing contract ran out so now they are listed as "Pro Ribbed Wrap Grip" grips. They are very good for player sticks because they do not have a big butt-end bulge. They go on easy and stay on and you can get whatever color you want. The best part is they do not wreck your gloves. Here is a photo of the three types of player grips I use. The two on the left are "Pro Ribbed Wrap Grips". I use their goalie grip on my goalie sticks. If you prefer a "big butt" end they have those as well. Go to their web site for more info.
;)
Stick Bag
Get a stick bag to transport your sticks to the rink and store them at home. The bag makes it easier to carry multiple sticks and protects them from damage. They generally can store 5 sticks.Here is a photo of my Bauer stick bag. Here is a shot of the opening showing the five sticks I take to the rink.
;)
;)